Quantcast
Viewing all 138 articles
Browse latest View live

Lucky FABB - Day One

I just got home and I am feeling "FABB"-ulous! Oh my goodness, what a day! Some of you may have seen my posts about attending Lucky Magazine'sFABB (Fashion and Beauty Blog) Conference in New York City and today was Day One! After debating whether or not I should go, I am certainly glad I did because I had an amazing time!


Like most events, I was the first one at the door. I always feel embarrassed being so early to things, but I got front row seats, so I can't complain too much. I planned on meeting Carla from Fashion Maven Mommy at the doors; and I was so excited because after talking via-Twitter for over a year and a half, I finally had the opportunity to meet her! What an absolute doll! First of all... she is gorgeous! Second of all, she is so sweet and extremely friendly! Third of all... did I mention she is gorgeous?!? Anyways, we walked in the door and immediately walked to the stage where the conference was being held. It was surreal! The set up was simple and elegant and I could not wait for it all to begin! 


Carla & I


Opening remarks were made my Lucky Magazine's Editor in Chief, Eva Chen, who is one of the most incredible women I have ever met! She is smart, stunning, fashionable and down to earth! Carla was having major fan girl moments because Eva was that cool! I had the opportunity to take a photo with her, and the fact that she complimented my lipstick totally made my day!

Eva Chen (left)

Woot, woot! Eva Chen!!!

The breaks were awesome! During the first one I met Heather from Beauty Unbiased and Katie from Martinis and Mascara, who were both equally amazing and equally gorgeous as Carla! Seriously...I was surrounded by some pretty hot ladies all day :) 


Katie & I

Anywho... nail art, handbags, Charming Charlie jewelry bar!!! Yeah...all on break! It was awesome! I hit the jackpot at the Charming Charlie table and snagged some hot necklaces and trendy bracelets! Carla was able to be sneaky and grab a bracelet that I had my eyes fixated on, but we won't get into that! Don't worry people...nothing illegal happened ;)


I then hit the Gifting Suite and grabbed a cozy scarf, a L'occitane candle and perfume and a pair of Yosi Samra flats, which came in handy at the end of the day when I felt as if my feet were going to explode from being in 4 inch heel boots all day!


The interviews and panelists were so insightful! A lot of the advice they were giving regarding blogging and the do's and don'ts were sort of obvious and I'm almost positive that everyone in the room knew the basic ground rules; but it was still extremely enticing and I loved hearing everyone's different perspectives and opinions!


Community ROI: Turning Your Readers Into Your Advocates
FROM THE RIGHT:
Moderator: Verena von Pfetten, Executive Digital Editor, LuckyMag.com
Alisa Gould-Simon, Co-Founder, VP of Partnership & Creative Direction, Pose
Gabi Gregg, Style Blogger, GABIFRESH
Erica Domesek, Founder, P.S. - I Made This


A Conversation with BryanBoy


Five Mistakes You Don't Want to Make
FROM THE LEFT:
Moderator: Hayley Phelan, Fashion Features Editor, Lucky
Lindsey Calla, Style Expert & TV Personality, Saucy Glossie
Amber Venz, President & Co-Founder, rewardStyle
Mattias Swenson, CEO & Co-Founder, Bloglovin'


Where to Post What:
What Social Media Platforms Are Best for Your Content
FROM THE LEFT:
Moderator: John Januzzi, Senior Digital Projects Editor, LuckyMag.com
Aliza Licht, Senior Vice President, Global Communications, Donna Karen International
Suzanne Schloot, Social Media Manager, Kate Spade New York
Stephanie Horton, Chief Marketing Officer, FarFetch
Amy Cole, Brand & Content Strategy, Instagram


Besides Eva Chen's awesome interview, she was also the interviewer for the two highlighted interviews of the day! Eva Mendes and Kate Bosworth were there! Yup...like 15 feet away from me. Pretty amazeballs! Honestly...I never considered myself a big fan of either celebrity, but then again I never really thought about it. I now have a different outlook at the utmost respect for these two brilliant and beautiful women...especially Eva Mendes! WOW! The woman was breathtaking! Literally her eyes sparkled! She spoke so eloquently,  was dressed very classy and hearing her speak, laugh and have fun with the audience was just great! I've already determined that I want her to be my friend! That's right Eva...CALL ME! ;)


I ended the day going out to dinner with Carla and Heather! We had a lovely time, as we  enjoyed a few drinks and chatted over Japanese cuisine.

Overall, Day One was simply amazing and I cannot wait for tomorrow. I met some incredible women throughout the day. Honestly, I thought I was going to be a bit intimidated because I knew for a fact most attendees were going to be fashion bloggers and I am the farthest thing from being a fashionista! I was amazed at how confident, comfortable and "at home" I felt being around all of these women! They were all gorgeous in their own unique way and it was an honor to have been surrounded by all of them!

Stay tuned for my Day Two update and I hope you enjoyed some photos from Lucky Fabb - Day One!!!

Lucky FABB - Day Two

What an absolutely motivating two days! As you know, I had a fantastic Day One. Day Two was a tad different, but just as great! The location for Friday was moved and we were told to go to the Conde Naste building in Times Square. What an incredible building... just WOW! Like Day One, I was the first one there, but instead of waiting online for an hour like a moron, I decided to indulge in a Pumpkin Spiced Latte and enjoyed an early morning visit to Sephora! Did you know that the Sephoras in NYC open at 8AM??? I was quite pleased :)


HA! I Great photo, but I just noticed that the ad on top of the gab is for a strip club! 
Touche, New York! Fail, Miss Niki...

Also while waiting online, I met Adventures of a Misfit Librarian. She was just fabulous, gorgeous and so damn funny! We had 3 out of 4 sessions together, grabbed lunch at Chop't and enjoyed the day together! We really had a lot in common and I almost fell off my seat and leapt in excitement when she told me she was an American Horror Story fan! My type o' gal!

When I say that second day was different from the first, it was because this time, everyone was separated into preselected seminars, which was great! I started off the day watching celebrity makeup artist Jake Reilly, which was just fantastic! Although he was there promoting products that I know he dang well doesn't use on Katy Perry or Christina Aguilera, it was still fun to watch a master at work!


At 11:30, Misfit and I headed over to Session 2, Founder's Series: How I Made It, with Deena Varshavskaya, founder of  Wanelo and Katia Beauchamp, founder of Birchbox. I felt really bad because I was really tired and yawning throughout their presentations. This had no reflection on what they were saying, I was just exhausted from the day before! Both of their presentations were great, and I kind of want to go back to Birchbox again! Perhaps I will!


While I enjoyed the first two sessions, I must admit that Session 3 and Session 4 were the most beneficial for me! During Session 3, I watched John Januzzi, Lucky Magazine's  Senior Digital Projects Editor, interview sisters Danielle and Laura Kosann from The New Potato. The session.... "Quit Your Day Job; It's Time To Be a Pro Blogger". I WISH!!! Listening to how they got started and how they work together was quite insightful!


However, it was Session 4 that gave me the motivation I've been looking for, for quite some time! I've been at a standstill and so busy lately, that my blogging has sort of stopped. It totally sucks, but I needed something to give me that push and the conversation between Elana Fishman, of Lucky Magazine, and Jordan Reid, of Ramshackle Glam, was just amazing! Jordan Reid gave us bloggers such incredible advice and she is just so amazing at what she does! Really, go check out her blog! I think she is one of my new inspirations and the reason for Hello Miss Niki's future changes! (Hint, Hint... stay tuned).


While I had such an amazing time, I was glad it was all over so I can go home, reflect and take in all the information I have absorbed over the past two days. But... the icing on the cake... the GIFT BAG!!!! By the beard of Zeus, it was incredible! It was sort of awkward carrying this huge bag around NYC as I chased after buses and rode the ferry, but I didn't care! I glanced in the bag and saw Becca, Two Faced and Bliss products, so I didn't care if I had to carry the dang thing around for another two days! Just take a look!


Amazing, huh? I was stunned and not expecting that to say the least! Fortunately, I found a place for everything, but I know now that I have to make room for next year ;)

BOO! Lush Limited Edition Halloween Concoctions!

That's right... I said "concoctions"! Some of you may remember how excited I was when I posted about the release of the Lush "Creatures of the Baaaath" Collection. I even serenaded you all in a weird sort of way. Well... Lush was kind enough to send me these two Limited Edition items for my evaluation and review (LUSH... THANK YOU!!!). Anywho, I tried the products and WOW! Let's just say, I've found some new faves!

Let's start off with my newest favorite bath bomb, Lord of Misrule. My bath water has never looked so beautiful. I mean it! This limited edition bath bomb, infused with a spicy herbal blend of patchouli and black pepper oil, smells absolutely amazing. Want to know what patchouli oil is? Read more to find out...


Once dropped into the tub, Lord of Misrule instantly started to fizz and froth, releasing deep green and wine colored swirls. I thought I was going crazy when I started to hear crackling, but it's true... it crackles! A fun little surprise!


Check out my Lord of Misrule Bath Bomb Demo!


It look a lot for me to finally use the Pumpkin Bubble Bar. I would have written this post sooner, but I didn't want to break up the cute little guy into my bath! He was just too precious. Poor little Pumpkin has resorted to bubbles, but oh was he just wonderful! The water turned orange, as expected, and my bathroom was filled with a citrus aroma. I'm not a big citrus fan, but it smelled fantastic making me feel clean and fresh!


I am quite happy because I heard that Lord of Misrule is sticking around for the holidays (YAY). I have been meaning to go get a few more of these babies, but I haven't had a chance! I will for sure be indulging in a few more of these!

Julie G Limited Edition Frosted Gumdrops Holiday Collection

Yes, I know... Halloween is tomorrow and I'm blogging about a holiday nail collection. I don't care! I am absolutely thrilled to tell you all about this collection! 


Some of you may know that a few weeks ago, Jesse's Girl Cosmetics released the NEW Julie G Limited Edition Frosted Gumdrops Collection (YAY). This collection includes 6 chic, textured shades that are simply perfect for the holiday season. You should know how much I love and adore the original Frosted Gumdrops, so I was thrilled when Jesse's Girl sent me the collection to try and review! I was tickled to say the least! It's wonderful still remain my favorite set of textured polishes.


Gorgeous, right? What I loved most about the polishes (besides the lovely shades), is how quickly it dried. I was able to move around and do stuff around the house 5 minutes after application. 

Silver Bells, Gift of Gold and Sleigh Ride have to be my absolute favorite! Admittedly, I'm not a big fan of purple nail polishes and I was expecting Ho Ho Ho to be more red than pink. I probably would have been happier with a deeper red, but I'm not complaining! Mistletoe is not a favorite, but a fantastic shade for the holidays as I plan to incorporate it in some holiday nail art!

Right now, the Holiday Frosted Gumdrops Collection is sold on the Jesse’s Girl website, but should be hitting your local Rite Aids soon! Individually, these polishes go for $3.99, so you really can’t go wrong! High quality, gorgeous polishes for a reasonable price…hello! Pick these up today and rock them this holiday season!


Oh... and one more thing! I know it has been quite some time since my Julie G Frosted Gumdrops Collection Giveaway, but it's time I pick a winner! I want to take a moment to apologize! The giveaway has been over since late September, and I have been keeping you all waiting! I feel terrible, but have been so busy and kept forgetting to post! I am sincerely sorry and hope you all forgive me and understand that I appreciate you and your entries to the giveaway! So rather than keep you all waiting any longer... the lucky winner of the Julie G Frosted Gumdrops Giveaway is...

a Rafflecopter giveaway

Congrats, gorgeous!!! Once again... I am so terribly sorry it took so long! But I certainly hope you enjoy the polishes and I'll be sure to send them out soon!!! Thanks again :)

Happy Halloween!!!

HAPPY HALLOWEEN to all my fantabulous readers!!! BOO!!!


It's the first normal Halloween in New Jersey after two years! The year before there was a snow storm, last year we had Hurricane Sandy and this year we can all celebrate and enjoy the day!

Granted, I will be at a hotel because tomorrow is my sister's wedding (YAY), but I will get myself all zombied up on Saturday for my friend's Halloween party! I will share my full costume on Monday, but here is a little sneak peek :)

Yup...that's me!!!

So for all of you who are dressing up, have a fun filled day! Don't eat too much candy! Okay... eat what you want and ENJOY!!!

Maid of Honor Reporting for Duty!

Today is the day!!!! My little sister, Kristina, is getting married!!! I cannot believe it is finally here! After all the planning (and typical wedding planning drama), it's all over after today. Well... not over! Technically, it is a brand new beginning for her and her groom, Caesar!


I am super excited! Most of you know that I am my sister's Maid of Honor. I'm actually her Matron of Honor, but I don't really like the sound of that. Oh well... I'm a Maid! While it was a lot of work, I think I kicked Maid of Honor booty! With the help of some fab bridesmaids and extremely helpful mother, I was able to pull off a classy, elegant bridal shower...


 And a fun, hilarious, memorable bachelorette party!


Today, November 1, 2013, my sister will be marrying her soul mate, Caesar, who will officially be my brother after 6PM today! Caesar is an extremely lucky man because my sister is probably one of the most amazing, courageous, strong, talented and beautiful woman I've ever met! 

Caesar and Kristina - I wish you nothing but a lifetime of happiness and love. You two mean the world to me and I love you both with all of my heart! Congratulations Child and CC!

My Best Friend's Wedding

Let's get one thing straight... my sister is my best friend! We have such a strong relationship and seeing her get married on Friday, November 1, was one of the happiest, yet emotional experiences of my whole life. 


I started off the day waking up at 5:30AM to my sister jumping on a hotel bed screaming "Today's my wedding day... today is my wedding day". There was no going back to sleep after that!

The morning weather was really cruddy and we were all kind of nervous, but my goodness, the day turned out to be absolutely beautiful! All the girls assembled at the hotel at around 9AM to start the wedding day preparations! Surprisingly, it was quite relaxing and low key and everyone seemed to be on schedule.


I, of course, did my sister and mother's makeup, and while I couldn't have been happier making them even more beautiful during this special day, the pressure was on! My stomach was literally in knots until both their eyeliner was applied! Luckily the eyes were even and once that part was over it felt like a weight was literally lifted off of my chest!


Make-up used on Kristina:
FACE
MAC Blush in Pink Cult

EYES
MAC Paint Pot in Ochre
L'Oreal Carbon Black Mascara *waterproof, of course*
LIPS

All of my sister's bridesmaids looked absolutely stunning, the mother of the bride was elegant and beautiful, my father looked ever so dapper and handsome and my sister was the most breathtaking bride I've ever seen!


As she walked down the isle with my father, her lucky groom was standing in the front waiting for her. Needless to say, I cried like a baby the majority of the time. I was not nearly this emotional for my wedding. There was something about hers that made me feel so much happiness. I won't get into the personal aspects of our lives, but my sister has been through a lot. Seeing her walk down that isle, with that beautiful smile on her face made me the second happiest woman in the room. All she ever wanted was to find love and share a wedding with the family and all of her dreams were coming true right in front of my eyes.

Image may be NSFW.
Clik here to view.


I couldn't be happier to call my sister's new husband, my Brother-In-Law. He truly loves her with all of his heart and I could tell that he genuinely loves our family. Kristina and Caesar have made each other better people and I know they are going to live a lifetime of love and happiness.


Bottom line, it was the most amazing day!

Congratulations Kristina & Caesar!!!


Now...I will be babysitting their little monster while they are honeymooning in Hawaii!!!

A Zombie Roams New Jersey!

I'm sure there were a few Zombies in NJ actually! While I was exhausted from my sister's wedding the night before, nothing stopped me from going to my friend's Halloween party!


It's been awhile since I dressed up for Halloween, I decided that I was going to do it all up in the makeup department! I've never gone all out with Halloween makeup, and what better way to celebrate the art of makeup than dressing up as a Zombie?

Thanks to my favorite beauty guru, Julia Graf, I was able to follow her Zombie Halloween tutorial to get an idea of what makeup I needed to make this work. 

I pretty much used everything she used which included a Kryolan Color Wheel. I wasn't able to find the exact one she had, so I used the Bruise Wheel, which was awesome! I also grabbed some Blood Gel from Cinema Secrets, which was the most realistic fake blood I've ever used! Hmmm...does that even make sense? I was also able to finally use the Makeup Geek Gel Eyeliner in Poison that I bought months ago! I wrote a review on the Makeup Geek Eyeliners almost a year ago and haven't used Poison until the other night! It was perfect for the look, so I'm thrilled that Julia Graf suggested it in her tutorial!


To add a little more creepiness to the look, I ended up using red contacts from Pinky Paradise in Super Pinky Bright Red. These contacts were awesome! Mind you, it was my first time ever using contacts, so I needed to do a few practice runs before the party. The first time it took me about 45 minutes to put them in and 45 minutes to take them out. Luckily, the night of the party didn't take me too long. I just don't like anything near my eye. Which doesn't really make sense due to my obsession with eyeliner and mascara. What can I say, I'm a tad odd. These contacts really made the look complete and totally freaked everyone out!

I ended up winning Spookiest/Scariest Costume and even photo-bombing a few pics!

Wasn't sure if my brother-in-law & sister-in-law wanted their faces to shown :)

We had a great night! I need to really need to think about next year now. Think I've got time :)

Image may be NSFW.
Clik here to view.
Duck Dynasty meets The Walking Dead

It's Time to Turn Over a New Leaf!

That's right! It's time to make a few changes! It's obvious that my blog posts have slowed down a little bit. Admittedly, I lost motivation and it was difficult for me to muster up the creative energy to crank out posts throughout the week. Attending Lucky FABB gave me the push I need and it made me realize that I have to make a few changes... don't worry... all good changes!


My passion is beauty! I think that makeup is a beautiful art and I just love everything about it! I love doing makeup, I love watching tutorials, I love the colors, the techniques... EVERYTHING! However... I feel like it's getting a bit stale and I need to broaden my horizons a bit. Hello Miss Niki is now going to be a Beauty & Lifestyle blog. I've written a few lifestyle posts in the past, but I really want to have a little more fun and indulge in more experiences!


Manicure sets & recipe box that I made for my sister's bridal shower!

Beauty will always be #1, but, for example, I want to write up a few DIY posts! I'm not very crafty and people who know me may find it funny that I, Nicole, want to do some fun projects! It's totally not me... but I want it to be! I really want to have fun and I think that making these changes will make Hello Miss Niki even better! 

Image may be NSFW.
Clik here to view.
I also want to establish a few collaborations. Allow me to introduce to you my sister, Kristina! I've mentioned her name several times in the past, but she will be in many more posts in the near future. 

Kristina is a talented photographer and has an eye for creativity! At the age of 23, she has her own photography business and a successful one at that! I forget when she started up Kristina Traficante Photography, but either way, over the years, she has built up her portfolio, capturing countless beautiful memories for her clients.

Kristina is also a damn good cook! Her new husband is a lucky man, as he will be well fed for eternity!

The two of us are going to share recipes, work on home decor projects and a few other types of DIYs! I can't wait! Be sure to visit her website at ktraficantephoto.com and LIKE her Facebook Page!

I am still trying to write up a game plan for the future of HelloMissNiki.com, so this post is going to be very general. Just expect a few changes and stay tuned for some really fun posts! I think you'll enjoy them!

As always, thank you all for your ongoing support! It means the world to me, especially since I have been a tad MIA lately. It's nice to know that I still have a fantastic network of readers, fellow bloggers and friends waiting for me when I log on and post to Hello Miss Niki.


Thank you!

6 DIY Ways to Dress Up Your Hair

*Guest post from Selina Torres

Like a lot of women, I face the same dilemma every morning.  Should I take the time and actually do my hair, or should I just throw it in a ponytail and go?  I could spend an hour with my curling iron, but I always end up with the same result.  The curls are nice, but they’re so boring!  Well, it’s more than just the curls, it’s all my hairstyles.  I’m in a hair rut. 

It struck me that the ultimate problem was a lack of accessories.  I need to put as much work into dressing up my hair as I put into dressing up my body.  And in reality, it’s not as daunting a task as it sounds.  Here’s what I came up with:

Fanciful Flowers


We tend to associate flowers with spring and summer, but there’s no reason why we can’t wear them well into the colder months.  Chiara at Not Daydreams created this fabulous autumn flower hairpiece and was kind enough to share her process.

What You Need:
  • Silk Flowers 
  • Barrette Clip
  • Small Pearls
  • Hot Glue Gun
Instructions Here


For those of you who prefer the real thing, Stephanie Brinkerhoff has some great tips for wearing real flowers in your hair.  You can have a florist create the hairpiece, or do it yourself.  Just remember, fresh flowers have a finite life, so don’t cut them until the very last moment possible.

Handsome Headbands


I absolutely adore this dainty double lace headband, and it’s so simple to make! Elisa at McLaughlin Designs even shares a tutorial on how to re-create her adorable boho hairstyle. An added tip from me: To keep strands from sliding out of the headband, finish it off with a firm hold hairspray. My personal favorite is Radiant Fix Hairspray from Gloessentials.

What You Need:
  • 36 inches Lace (1 in. width or narrower)
  • 3 ½ inches Braided Elastic (3/8 inch width or larger)
  • Needle & Thread
  • Sewing Machine (optional)
Instructions Here


Creating this hanging chain headband is a snap.  I think this unique look has the perfect mix of femininity and edge.  

What You Need:
  • Spring Headband
  • Variety of Chains
  • Jump Rings
  • Wire Cutters
  • Flat Nose Jewelry Pliers
Jazzy Jewels


The gorgeous headpieces of the 1920s are making a comeback in a major way, and I for one couldn’t be more excited.  This simple DIY leaves you with an accessory that looks far more expensive than it really is.

What You Need:
  • Jeweled Applique
  • Chain
  • Jump Rings
  • Flat Nose Jewelry Pliers
  • Hot Glue Gun
Instructions Here


These sophisticated pearl hairpins are so versatile that you can use them to dress up almost any hairstyle.   Much like the little black dress, pearls are a fashion staple that every girl needs in her wardrobe.  Why not wear them in your hair rather than around your neck?

What You Need:
  • 8mm – 12mm Half Drilled Faux Pearls
  • 20 – 22 Gauge Wire
  • Bobby Pins
  • Wire Cutters
  • Flat Nose Jewelry Pliers
  • Super Glue
Remarkable Ribbons


Wrestling with a silk ribbon can be a major pain.  However, when it’s attached to a clip, styling is made much simpler.

What You Need:
  • 12 inches of Ribbon 
  • Alligator Clip
  • Hot Glue Gun
  • Scissors
Instructions Here


You don’t have to be incredibly crafty to style your hair with a ribbon.  Angela over at How to Hair Girl shows us 5 ways to incorporate ribbons into our favorite hairstyles.
These great tutorials have taken away all my excuses for continuing to have boring hair. Ladies, I say it’s time to break out of our style ruts and start embellishing.  After all, your hair is one of your best assets and it deserves as much love as the rest of your look.

When she’s not fighting bedhead and taming flyaways, Selina Torres spends her time writing for Glisten, a marvelous new skin care company.

October Faves

As part of my blog changes, one thing I need to focus on is consistency and themes! I've tried to do fave posts on and off for months, but I never follow through! This time... I WILL! I'm not going to blabber on and on, I'm just going to jump into my October Faves, so enjoy!


Hourglass Veil Mineral Primer
This primer is an absolute hit! I've seen countless reviews on this product lately and everyone seems to adore it just as much as I do! This is a mineral based, water-resistant primer with SPF 15 that evens skin tone and eliminates shine! I just love the texture of this primer, as it is silky and makes my skin feel amazing before applying my makeup!

Hourglass Ambient Lighting Powder in Diffused Light
This has to be the most awesome highlighter I've ever used! I saw a few tutorials where Jacklyn Hill used this product, so I had to have it. It's a bit pricey at $45.00, but it's so worth it! Diffused Light is a soft, warm, pale yellow powder that reduces redness and makes skin radiant. I apply it on my cheekbones, center of my nose and forehead every morning and just love it!

L'Oreal Voluminous Butterfly Mascara
I'm big on drugstore mascaras. I've been picky with quality lately, but mascara is always a product that I will most likely always get at a drugstore. My favorite part, besides that fact that it makes my lashes look amazing, is the brush! The applicator has an asymmetrical lashline shape that makes it easy and quick to apply. 

Sigma Beauty L05 Lip Brush
For so long I've avoided using a lip brush, but I've discovered that I cannot live without it! I take the Sigma L05 brush, dab it on the lipstick that I want to wear and apply. Not only does it distribute the color beautifully, but the application is extremely precise. I've noticed that since I started using a lip brush, I have been getting more compliments on my lipstick and for some reason the color has been lasting longer. I suppose it's because I'm buffing the product into the lips more. It's awesome

Dove Color Care Products
I'm one of those girls who aren't exactly sure what my natural hair color is. Right now, it's currently a chocolate brown that I love. However, because I was a blond before this dark shade, my hair becomes striped of the color and the lightness peeks through, making my hair sort of an awkward red. I hate when that happens. I've noticed that since I've started using the Dove Shampoo, Conditioner and Leave-In Conditioner, my hair color has not only lasted longer, but looks and feels 100% healthier!

YSL Rouge Volupte Silky Sensual Radiant Lipstick in Forbidden Burgundy
It took me awhile to find the right lip shade for Fall. But discovering Forbidden Burgundy from YSL was like hitting the jackpot! This lipstick is so smooth, so creamy and soooo pigmented! Yes - a bit pricey, but you really get quality with this lip color! Forbidden Burgundy is a deep plum burgundy that is perfect for my skin tone. I am very fair skinned, yet love deep colored lipsticks, and this shade has me written all over it. It looks so awesome on me, that Eva Chen, Editor in Chief of Lucky Magazine complimented me and asked me what I was wearing when I went to Lucky FABB!

Bite Beauty Lip Cashmere in Port
While I love my YSL lip color that I mentioned above, I certainly do not wear it alone. I like to add a bit more of a deeper, blue red into it and that's where Bite Beauty Lip Cashmere in Port comes in! I don't know how to explain this product, but Sephora claims it is a cream-to-powder matte lip color. I suppose that sums it up. It's just awesome. I was iffy about the texture at first, but I got used to it and love it! It's really long lasting and the shade itself is stunning. I really want to get a few more of them!

Easy DIY Autumn Centerpiece

YAY! My first DIY! Well... technically I did two in the past (DIY Lip Scrub& DIY  Makeup Brush Storage), but this is now one of many so I am super excited! Today, I am going to make an Autumn centerpiece and it's really quite simple! Because I'm not too crafty, I can't start out too crazy! Baby steps, Niki... baby steps!


Things you'll need:
  • Glass vase (any kind)
  • Popcorn kernels
  • Candy corn (optional)
  • Sticks
  • Leaves (optional)
  • Ribbon, yarn, anything you can think of to tie around the vase (optional) (not pictured below)

The project is pretty self explanatory, but I think it is such a pretty accent, especially for my living room.
1) Be sure to clean the vase. When I took it out of the paper it was wrapped in, a powdery film was left behind, so make sure you clean it well.

2) If you just want to use the popcorn kernels, just slowly pour it into the vase. BUT... if you want to spice it up and make it more festive, mix the candy corn and popcorn kernels in a large bowl.


3) Fill the vase with the popcorn kernel and candy corn mixture, but leave around two inches at the top. You don't want it to overflow and create a huge mess.


4) Add the sticks! It doesn't have to look perfect. While looking for the sticks outside, I made sure to get all different shapes and sizes.

5) These last two steps are optional, but the centerpiece was looking really plain so I felt I needed to add more. I grabbed a bunch of leaves outside and wanted them to be all different shapes, sizes and colors. You can either put the leaves at the top of the popcorn kernel and candy corn mixture, OR you can even carefully hot glue them to the sticks. I, unfortunately, have yet to buy my own hot glue gun, so putting them at the top of the mixture was good enough for me.


7) I needed to add a finishing touch. Something was missing and I wanted to wrap something around the vase. You can get very creative with this step. You can take ribbons, yarn, long, thin pieces of hay, anything to wrap around the vase. I ended up grabbing a pre-made accent that was wrapped around a big candle holder in my house. I'm not exactly sure what the item is called, but I wrapped it around and tied it in a sloppy bow (I didn't want it to be perfect, so I made it a bit messy) and put a little decoration within the bow. It gave the centerpiece the right touch and the mission is complete!


See... very, very simple! Again - I am a beginner with DIY projects, so something that didn't require too many items, that wasn't very messy and that was inexpensive was just perfect for me!


You can really get very creative with this project, as you can pick a different kind of vase, add acorns instead of candy corn to the vase filling or you could even paint the sticks! There are many substitutions you can work with to make a simple Autumn centerpiece!

Still Lovin' Wantable

I feel like I'm watching a baby grow-up! I've had the opportunity to work with Wantable when they first launched and since then, they've changed their branding and keep getting better and better! This box is just awesome!


When you sign up for Wantable, you get to set up a customized profile. Within the settings, you can note which products you like and dislike, as well as the looks, shades, and more! This box is made to fit you and who you are and Wantable has really captured that! I noted in my profile that I LOVE lip color, nail polish and makeup tools; LIKE blush, highlighter and lash products; and DISLIKE brows, eyeliner and bronzers. Do you see the photo above? I got exactly what I asked for.

Here are some screenshots of the profile customization process:

 _________________________________________________________________


It's so cool! I've mentioned in past reviews that the price is a bit of a turn off and while I do believe it is expensive, it's totally worth it at $36.00 a month if you have a subscription! You really great products that you are guarenteed to enjoy, and their full size! Can't go wrong. If I dropped my other beauty boxes, I would totally get a subscription, but I'm not yet ready to part with the other ones. Once I do, I will be sure to sign up, but again, the price is a bit steep for me, personally, right now.
Anywho... enough about my finances. Let's get back to Wantable! In my last review, I mentioned that they have changed their branding. Well one of the complaints that I had is that they still used the same packaging. Read my last review to learn more about this minor issue. I must apologize for my complaint. I suppose that the branding process was not 100% complete because now the box is chic and reflects the high quality service and products from Wantable.
Let me show you what products I received, and perhaps you will understand why I'm raving!

Japonesque Angled Foundation Brush


Jordan Liberty Fake It Valley Girl Lashes


Besame Cosmetics Classic Color Lipstick in Noir Red


Lise Watier Ombre Souffle Supreme Sample


Manna Kadar Lipstick Russian


Color Club In Tru Fashion Polish Style Icon 


LAQA & Co. Nail Polish in Greedy Guts
Seriously! Amazing! The lipsticks are incredibly gorgeous and pigmented,I could always use a brush, red nail polishes (although I wish that maybe one was a different, deeper shade)... and Jordan Liberty Lashes, which I am so excited to try! I'm saving those for something special!
For a one time purchase of Wantable box, it is $40.00; and for a monthly subscription, it is $36.00


Wantable also has a jewelry and accessories box, with 3-5 handpicked pieces to match your personal preference. I have recently become into accessories and big trendy jewlery, so I may have to give that box a shot! Three or five pieces for $40.00....I think I'll give it a whirl!

HelloMissNiki.com Is Now Interactive! Introducing the Makeover Tool!

I have a really cool, fun new development for you and I think you will all get a kick out of it! A lovely representative from StyleCaster.com contacted me and informed me about the Makeover Solutions tool that they have. After an informative conference call and some troubleshooting, I decided to take on and launch the Makeover Tool!


The Makeover Tool is a new page on HelloMissNiki.com that allows my fans, readers and fellow bloggers create realistic, interactive makeovers on preselected models or uploaded photos of themselves! Not only is it fun to try on new hair styles or view different shades of lipsticks, but you can also purchase the products that you use during your session right from the Makeover Tool's page! VERY COOL! 


Here's how to use the NEW Makover Tool:

1) Like I said, you can upload your own photo, but since I don't have a decent photo of myself, I am going to use one of the gorgeous models.
2) Once you choose your model, you are ready to go! You can do one of two things with your model, you can customize everything yourself OR you can head over to 1-Click Looks on the back navigation bar. That section has a bunch of pre-made celebrity looks that are so fun to work with. BUT, I want to make my own look :)

3) Time to choose the hair!

There are many pages of adorable looks to work with, but I am going to use this really cute hairstyle used from a photo of Bella Thorn (bottom right). 


And it certainly doesn't stop there! You can choose the color too! You are able to choose highlights and lowlights, but that is currently a feature that is being worked on and will be available soon! I am going to choose this brunette shade for my model.

4) Let's work on her foundation, shall we? I want to give her a full coverage look because I am just into full coverage. You can also work with her t-zone as well, but that's boring for this demonstration!

I forgot to take a screenshot of the foundation, but you can add concealer and blush in this section as well! It's very cool.

5) The eyes are fun to play with! From here you can choose one color or multiple colors, depending on the shade you are looking for. For now, I am going to choose this bright green shade from MAC, even though it's not a shade that I would ever use. I just want you all to see how awesome and realistic it looks on our model!


You can also add eyeliner. I chose a dramatic cat eye, because...well..why not???


And to finish it off... mascara, of course!

6) Now it's time for the LIPS!!! Love the lip section too! In this section you can choose a variety of lipsticks as well as lip glosses and lipliners!

7) How fun! Again - not a look I would typically go for, but it's all for demonstration purposes :)

Once you are finished, you can check out a Before/After view of your model.


8) Like anything specific products that you used on your model or yourself? No problemo! Check out the products section at the bottom of the page. It shows you all the brands you used and when you click on the product, it takes you to the page and shows you the shades you selected.

And there you have it. Not too shabby, eh? I really think this is a fun tool and I hope you can all utilize it and enjoy it as much as I do! Let me know what you think or if you have any comments or questions!

Have a makeover that you're proud of??? Feel free to share it with me on my Facebook Page or Twitter Profile!!! I would love to see your work!!!


HAPPY FRIDAY!!!

Sneak Peek: Rimmel London Stay Matte Liquid Mousse Foundation

This product has to be the best drugstore find in a long time! But... I didn't get it in a drugstore and it hasn't been released yet. Allow me to explain. Influenster sent me the Rimmel London Stay Matte Mousse Foundation for my evaluation and review. I was so excited to try this product out because I reviewed the Lash Accelerator Endless Mascara awhile back and loved it! I enjoy testing Rimmel products through Influenster, so I am thrilled that I have another opportunity to meet the review and Badge Holder requirements. I am determined to gain another Rimmel Badge. If you're not sure what I mean my Influenster Badge Holders, check out their website for more information. 

Image may be NSFW.
Clik here to view.

Rimmel London is bringing you the Stay Matte Liquid Mousse Foundation - "a breakthrough, feather light, oil free forma with an airy mousse texture that's comfortable on your skin, never heavy or greasy." So does this foundation live up to Rimmel's claims? It sure does!

I knew this foundation was going to be good before I tried it because I've always been a fan of Rimmel foundations. Rimmel has to be one of my top favorite drugstore brands, so I had a feeling I would fall in love with this product. 


First of all, I love the packaging. It's pretty... it's chic... I love it. It's a simple tube and all you have to do is squeeze the foundation out in order to disperse it. No pump or anything fancy like that, but it's all good! I'm trying to think what other foundations are in a standard tube, but none are coming to mind at the moment. It will hit me at 2AM or something ridiculous like that, I'm sure!


Once dispersed, as stated, it has a mousse-like texture. At first I thought it was going to be heavy because mousse foundations always make my skin look a bit caky, but once applied, it went on so smooth, felt extra lightweight and provided awesome, natural coverage! During this time of year especially, the corners of my nose gets really dry and I have issues with foundation and peeling. This foundation sat beautifully on my skin and you didn't even notice my face had any dry spots! It was awesome! Furthermore, I didn't have to use setting powder or even concealer! It dried matte, like Rimmel said it would and the coverage was so great, I didn't need anything to brighten up my eyes! 
Lastly, the foundation is extremely long-lasting. The other day, I had to go to the supermarket, in the rain and in a rush because I needed to get back to work. It was pouring and a bit humid, and while my hair didn't survive the inclement weather, my makeup sure did! The foundation didn't move... at all! I participated in the Influenster #StayMatte Twitter Party on Thursday afternoon and I was confident enough to take a photo and post it for conversation sake! 


So yeah... this stuff is awesome! I cannot wait for it to hit stores because I really do believe that everyone is going to be blown away! 

Rimmel London's Stay Matte Liquid Mousse Foundation will be available in 8 shades and available in, I believe, January 2014. 


Introducing HelloMissNiki.com's Newest Contributor, Laura!

Hello! It's such an honor to be contributing here on HelloMissNiki.  My name is Laura and I am a graphic designer by trade, and an artist, crafter, DIY'er, wife, home-chef, music-lover and bird-nerd by choice. 

I am looking forward to checking in on here from time to time with various things but I thought perhaps my best segue into this blog might be to share my favorite beauty items.  So, without further adeau:

Eyes

1) Bobbi Brown Log-Wear Gel Eyeliner- This is THE essential beauty product in my life. Like, "desert-island,you-can-take-one-beauty-item". I use it in my eyebrows.  I have auburnsish hair but my brows and lashes are especially light.  The little pot lasts FOREVER and it seems to stay on all day. I just smudge it in with a small angled brush. It is my only way of achieving expressive brows.  'Sepia' has been my go-to for years.  If I only have time for ONE thing, this is the thing I put on.

2) Maybelline Dark Circle Eraser Concealer- Before my wedding I tried SO many under-eye concealers. I even went to a few beauty counters at the mall, and had them apply their concoctions. Honestly, they all looked weird on me. I'm fair skinned with freckles, visible blood-vessels, and slight puffiness under my eyes (more so than "dark circles"). I picked this up at the drug store and honestly, I was really happy with the results. A lot of times they tell you to go green or pink yada yada... the warm tones of this product went well on my skin and the level of coverage was nice without being artificial looking.  As I'm turning vampire pale in winter its a little yellow but, who are we kidding, winter is kind to no one.  I am fair with warm tones and chose, 20 Light Pale.


3) Maybelline Great Last Washable Mascara- You know- the pink-and-green one. I was in college when I got hooked on What Not To Wear, and Carmindy always seemed to use this. That's when I started with it and I have been content all this time. It's kind of just a go-to product. It doesn't smudge/smear for me and it washes off easily at the end of the night.  I use Blackest Black.
4) As far as shadows and stuff go, the above is all I really wear on my eyes on a semi/daily basis.  For going out, I'll put on some matte black smudgy shadow as liner and sweep some vanilla matte on my lid. I usually cover the whole thing with CoverGirls Eye Enhancers 3-Kit Shadow in Shimmering Sands (again I've been using this trio for years).  Uhm does it sound like I'm in a rut?  I hope not!  I'm just a 'less is more' person. 

Skin

Blush: I'm a Blush-A-Holic. I could do an entire post just on blushes. It is my favorite thing to experiment with and definitely the cosmetic that gives me the best 'boost'.  I'm a fan of sheer layers of BRIGHT color.  My all time favorites are:


1) Benefit Cha Cha Tint: Just loveeee this. Tricky to put on for sure. You need to work fast.  I usually put it on the back of my hand, then tap it on with my finger tip.  I guess what I love most is that it looks like I'm flushed or got sun; not that I'm wearing makeup.   But it truly lasts all day.  LOVE LOVE.


2) Maybelline Dream Bouncy Blush: Another solid contender in the blush-o-sphere. I use 70 Hot Tamale. Its a creamy to powder type of formula.  Doesn't make my skin too oily like other cream blushes I've tried.  Two thumbs up!


3 & 4) As far as powder's go (Sometimes I swipe a sheer layer over the top of one of the above if I really need it to last, or if I'm lazy/in a hurry- which is usually): Benefit Hervana, Physicians Formula Powder Palette in Blushing Berry, Wet n Wild Icon Blusher in Heather Silk, MANA Baked Blush in Tulip.

Lips

Easy.  I have two favorite products and that's about it:


1) Revlon Just Bitten Lip Stain: Takes practice applying; like all stains. But, I HATE goopy lips and this gives color like if your lips got a little sunburned. You just look young & healthy.  I have 'Flame' and 'Gothic'

2) Revlon Colorburst Lipgloss: Don't let the name fool you.  This doesn't really act as a gloss for me. I have 'Fire' which is the most highly pigmented product I have ever seen.  It will last until I am 90 because of how little I need.  I just put a dab on my finger and blot it on my lips. RED! It even makes an amazing stand-in blush. Same application method. 

That's about it folks!  I of course, have experimented with DOZENS of other products but these are my 'regulars'.  I don't even like the feeling of lotion on my skin so typically I don't wear foundation or anything.  Once in a great while, some loose translucent powder for fancy events.  Usually, just Dove Sensitive Skin soap and the above!
I really appreciate your time reading this, and I look forward to future contributions over here on the awesome, HelloMissNiki!  Peace!


A Note From Niki: Hey everyone! Please take a moment to welcome HelloMissNiki.com's newest contributor, Laura! I'm so excited that she will be a frequent guest blogger! You guys will LOVE her!!! Thanks Laura for this awesome post! I will be sure to go get that Revlon Colorburst Lipstick, for sure :)

Top 10 Fall Nail Polishes

Choosing my top 10 Fall nail polishes was quite a tough task! While I knew most of the polishes I wanted to share, it was difficult because I tend to gravitate towards deep reds. I have so many and love them all! It was hard to choose which ones I wanted to list, and I knew I couldn't list ALL deep red polishes. That would be boring, wouldn't it? 


Image may be NSFW.
Clik here to view.
This intense decision making took a lot out of me (clearly, I'm being dramatic), but I think I narrowed down my selection. Check it out!


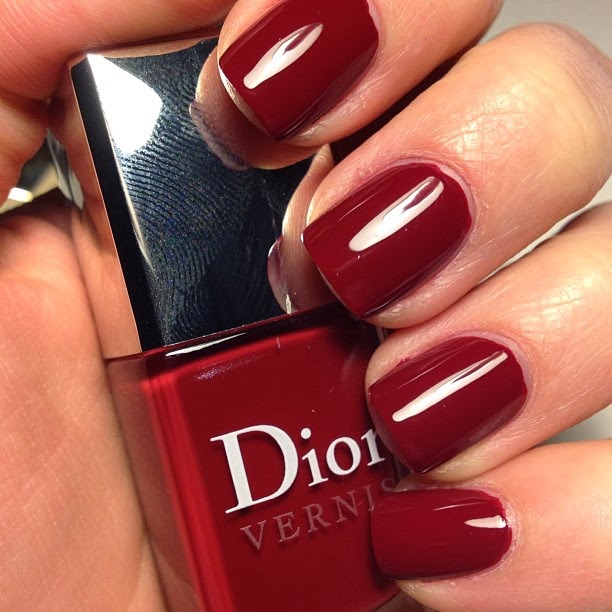
This is a newbie to my nail polish collection and out of all of the deep reds I own, this one tops them. First of all, this burgundy shade is simply gorgeous and the polish has the most amazing staying power. Besides constantly changing my nail color due to boredom, this polish has remained on my nails without a chip for days. Furthermore, I haven't even had the urge to switch it up! I am just in love with this shade!


Besides the fact that I needed this nail polish based on its name (come on people... Pink Floyd), I really did want a deep purple polish in my collection. Me and purples don't tend to get along, but I couldn't go wrong with this one. This aubergine shade is gorgeous, beautiful and packs a punch. And again - I love telling people the name! Even my father got a kick out of this one!


How can I not have this classic in my Fall nail picks? This deep eggplant shade has been a favorite for so long; not just for me, but for many! It's a classic... it's elegant... enough said!


I've had a few seasonal nail posts, and by now, you should know that I MUST have a classic red. Well... have you seen the photo above? Take a good look at it. Is it not the most beautiful red EVER?!?! This deep, creamy, cool red is absolutely amazing! This is probably my go-to nail polish and while it's rare that I use up an entire bottle of polish, I can see myself definitely running out soon. I'm obsessed!


I was on a desperate hunt for this polish after seeing it on Twitter without a name. Superstar is apart of the Andy Warhol Collection, which is one of the many reasons I love it. This was my first NARS Nail Polish and I was simply blown away. This smoky teal/blue shade applied like velvet! It was so pigmented and so smooth I just couldn't get enough of it! It's a favorite all year round!


Just like a classic red, I need a classic nude to turn to when I need to tone it down a bit. This soft beige/pink shade is perfect! It's another shade I can wear all year round, but if I need a subtle nail look for this Fall, this polish is the answer!


I went absolutely insane for this shade last year! I had to have it! It's gorgeous and perfect for Fall (which makes sense because it was apart of OPI's 2012 Fall Collection... the Germany Collection). When this polish is first applied it's a bit shocking, as it applies as a blue based purple. Shocking... I know! After a second coat, this shimmery polish transmits a combination of red, purple and gold and is just incredible!


I remember a few years ago, when I began my obsession with nail polish, reading that navy blue was a huge nail trend. I can't remember the year, but since then, I've been on the hunt for the perfect navy blue shade. FOUND IT! Julie G's Tokyo Nights is an opaque navy blue and "as deep as a moonless night". Seriously... it's perfect, right?


I honestly forgot that I had this shade, but after digging through my collection and finding this photo again on Instagram, I realized how gorgeous it was and how I am going to rock it this Autumn! This dark, plum creame shade is so beautiful! The best thing about Julie G nail polish, is not only do you get quality, pigmented, gorgeous polish, but you get it at an awesome price at $3.99!


I have to admit something... I held off from purchasing this shade for a long time. I just wasn't digging it. I was proven wrong. After making the purchase and rocking it for a few days, I realized that I love it! Subdued brown shades are perfect for Fall and this one especially is great to wear all year round. 

There you have it, folks! It was difficult to choose, but I've made my final choices. PHEW! That took a lot out of me :)

Stay tuned for another Top 10 polishes post, as the holidays are coming! Get prepared for a lot of red and tons of glitter!

Pumpkin Chalkboard! Say What!?!?!

Another DIY! I'm on a roll! Fall and Winter DIYs are going to be so much fun! Today I am going to show you how to have fun with a pumpkin and chalkboard paint! I think you are still safe to do pumpkin projects up until Thanksgiving and you can really get creative with this! It's very easy so let's get started!


Things you'll need:
  • Pumpkin (any size you want)
  • Chalkboard Paint 
  • Paintbrushes 
  • Paper towels
  • Paper plate 


1) Before you do anything, be sure that you wipe down the pumpkin with a paper towel. You don't want any dirt or debris to ruin the painting process. 


2) Pour a generous amount of chalkboard paint onto your paper plate.


3) Time to start painting so grab your paintbrushes! Be sure to read the directions on the paint! Some chalkboard paints require a certain technique and it's important to follow so you don't mess up the project!! You don't want to waste a perfectly good pumpkin do you? I first covered the pumpkin vertically with the paint, let it dry for about 15 minutes, and then followed up with a second coat, but painting horizontally.

First coat

Second coat (Hubby wanted to sit outside w/ me on the beautiful Fall day!!!)


4) The worst part... the waiting process. That's one thing that's not good about me and DIY projects; when I'm on a roll, I'm on a roll and I don't want to stop and wait. You have to wait a full 24 hours for the paint to set, so go make yourself a nice cup of tea and sleep on it.


5) After waiting the day for the paint to set, break your chalk in half and start scribbling small  patches around the pumpkin. Once you have done that, rub in the chalk, using your hand or the paper towel, in order to prep the pumpkin for writing. This also makes the pumpkin look a bit more vintage, so it's kind of a cool effect.


6) Time to draw, write, whatever you please! 


Isn't this fun?!?! I made this my dog's pumpkin for a few reasons. One... I decided to make it pretty and write my last name on it to put as a "Welcome" item in front of my house. Then I realized, I don't really want to share my surname on my blog. So I had to erase it (FYI - if you need to erase, just gently rub with a paper towel or dry washcloth). Two... I wrote Happy Halloween and then realized that I wanted to post this closer to Thanksgiving (Fail #2). Three... and this was a mistake on my part due to my impatience, I didn't let the pumpkin set for a full 24 hours. I did maybe like 20-22 hours. I suggest waiting the FULL 24 hours or longer because the paint started to peel off (BIG FAIL). So... my doggy benefited from this little project.

No... this pumpkin did not come perfectly, but I am learning to do these projects just like you guys! Either way, I had a blast making this adorable little pumpkin and I'm pretty sure my puppy-girl was thrilled!

I think I will make this a traditional project and make one every year, early in the Autumn season!

Kat Stays Polished Birthday/1st Blogiversary Giveaway

Hello, darlings! My good friend and fellow blogger, Kat is having a giveaway! Not only did she just turn 29 years old, but it's also the anniversry of her very first blog post! How exciting!


Kat has come very far in just a year and to celebrate she is hosting a giveaway! I was very fortunate in all this because she asked me to contribute and be apart of everything! I'm truly honored (thanks Kat)! 

Kat, myself and several other contributors are giving away 11 prizes and some of them are even available internationally! Be sure to read under each prize to see if it's open to you in your location.

So, let's not waste anymore time! Pictures of the prizes are available below -- some will be updated later. If you have any questions about anything, please feel free to ask me or Kat by visiting her blog, Facebook, or email katstayspolished@gmail.com.

GOOD LUCK EVERYONE!!!
Image may be NSFW.
Clik here to view.
Urban Decay Naked Basics [Open to International] from Kat
Image may be NSFW.
Clik here to view.
Zoya Raven, Ziv, Purity [OPEN TO US ONLY] from Kat
Image may be NSFW.
Clik here to view.
JulieG Original Frosted Gum Drops [OPEN TO USE ONLY] sponsored by Jesse's Girl
Image may be NSFW.
Clik here to view.
JulieG hOLIDAY Frosted Gum Drops [OPEN TO USE ONLY] sponsored by Jesse's Girl
Image may be NSFW.
Clik here to view.
Sinful Colors Leather Luxe Collection [OPEN TO US ONLY] sponsored by Lace and Lacquers
Image may be NSFW.
Clik here to view.
[OPEN TO US ONLY] sponsored by Accio Lacquer
Image may be NSFW.
Clik here to view.
Stila Snow Angel Palette [Open to International] sponsored by Hello Miss Niki
Image may be NSFW.
Clik here to view.
Zoya Dream, Zoya Payton, Barielle Very Bare, Barielle Edgy [OPEN TO US ONLY] Sponsored by ColorSutraa
Image may be NSFW.
Clik here to view.
OPI Mariah Carey Liq Sand mini sets [OPEN TO US ONLY] Sponsored by BruisedUpDollie
Image may be NSFW.
Clik here to view.
LVX 3-in-1 Treatment, OPI Liq Sand It's All San Andreas Fault, Sally Complete Salon Manicure Purple Posy, Sinful Colors Daddy's Girl [OPEN TO US ONLY] Sponsored by My Boyfriend Hates Makeup

NailNation3000 Prize Pack [OPEN TO US ONLY] Sponsored by NailNation3000

 
--total entries
--entries earned
Loading...
a Rafflecopter giveaway

November Man Faves

That's right... I said "MAN". Why not change it up a bit, right? Let's bring the boys in on this little thing I like to call a blog! I'm sure that all of my readers have a male figure in their life that they may recommend products to. Hey... some of my readers are possibly men, who knows! So let's get into some man faves, shall we?


Today, we have my hubby, David! David was actually really enthusiastic about telling me his favorite personal care products. Some men may not believe it, but taking care of your skin is just as important for you as it is for women! Sunscreen, cleanser, exfoliants are all part of a good skin care routine. My hubs is certainly not ashamed that he has many favorite products. While I only asked for his top 5, he kept going and gave me a top 10! WOW! I'm impressed! Let's get into some info about him and then we will jump right into the faves!
Personal Information:
- Male
- 26 years old
- EMT (Emergency Medical Technician)
- Firefighter
- Biker 
- Sergeant in Arms for Fourth Watch, a public safety motorcycle club
- Die-hard Jet fan

Health & Personal Care Habits:
- Shaves every other day
- Uses two different types of razors (1. Old school safety razor. 2. Schick Hydro 5)
- Diet - Tries to eat as healthy as possible, but due to job, has to eat fast and on the go
- Exercise - Always on the run. Attempts to take time to exercise, but job tends to keep him in shape.
- Drinks a lot of water! Tries to drink at least a gallon per day.

David's Favorite Products
*In no particular order

David really likes this product because he claims that it is very lightweight. Because it hydrates the skin, he now uses it as an aftershave and it doesn't burn as much as normal aftershaves. He feels that it replenishes and moisturizes the skin very quickly, without feeling greasy.


While David may not always style his hair, when he does, he turns to Axe Spiking Glue. He claims that the product has an excellent hold and doesn't flake. Furthermore, he says it is pliable, as he has time to style his hair before the product fully dries. 


I even admit... this stuff smells good! In David's line of work, he needs something that is going to last 12-24 hours and keeps him feeling fresh under stressful situations. He doesn't feel the need to reapply throughout the day because it's that long-lasting.


David has suffered from dandruff in the past and he feels that this is an excellent product that controls his dandruff. Since using it, he hasn't had any issuesand it smells amazing! "Cool Mint is also very invigorating", he says.

This stuff does exactly what it says! Nothing beats coming home from a long shift and coming out of the shower with that extra fresh feeling! He claims that it more than cleans, it refreshes.


LOVES! In addition to the clean feeling he gets from the body wash, he gets the same feeling on his face with this stuff... the feeling of refreshment! Before applying the Simple Moisturizer, David uses this product first, as it is refreshing and keeps his acne at bay.


I love that my husband loves Lush! It's a dream come true really! David swears by this stuff and claims it is "a home run". He usually suffers from harsh razor burn due to his sensitive skin, but this stuff keeps the burn at a minimum. It's certainly unlike any other shaving cream.


While I feel that this is an excellent face exfoliant, David actually uses this item on his hands! In his line of work, his hands take a beating and more often than not, needs an extreme cleaning. The Ocean Salt gets into all of the hard to clean areas, making his skin feel soft and smooth.

Three Lush products! Bestow my heart! I can vouch for this when I say that he uses this stuff every single night! He loves this it because it is lightweight and not greasy at all. Because he uses his hands a lot, it keeps his hands from getting dry and cracking, especially in the winter months.


This is David's favorite cologne of all time! Aqua DiGio has a masculine, fresh scent that goes a long way. Every time he wears it, he gets compliments on it. It's a very attractive scent, that's for sure. I personally love it... after all, I did marry him, right?


So that's what we've got for today. Some pretty good choices, eh? Most of these products are quite inexpensive, so if your husband, boyfriend, father, brother, uncle, cousins, friends ask you for some product recommendations and you have no idea, recommend a few of these! They're definitely worth a shot!
Viewing all 138 articles
Browse latest View live